

Why Backsplash Tile Installation Transforms Your Kitchen
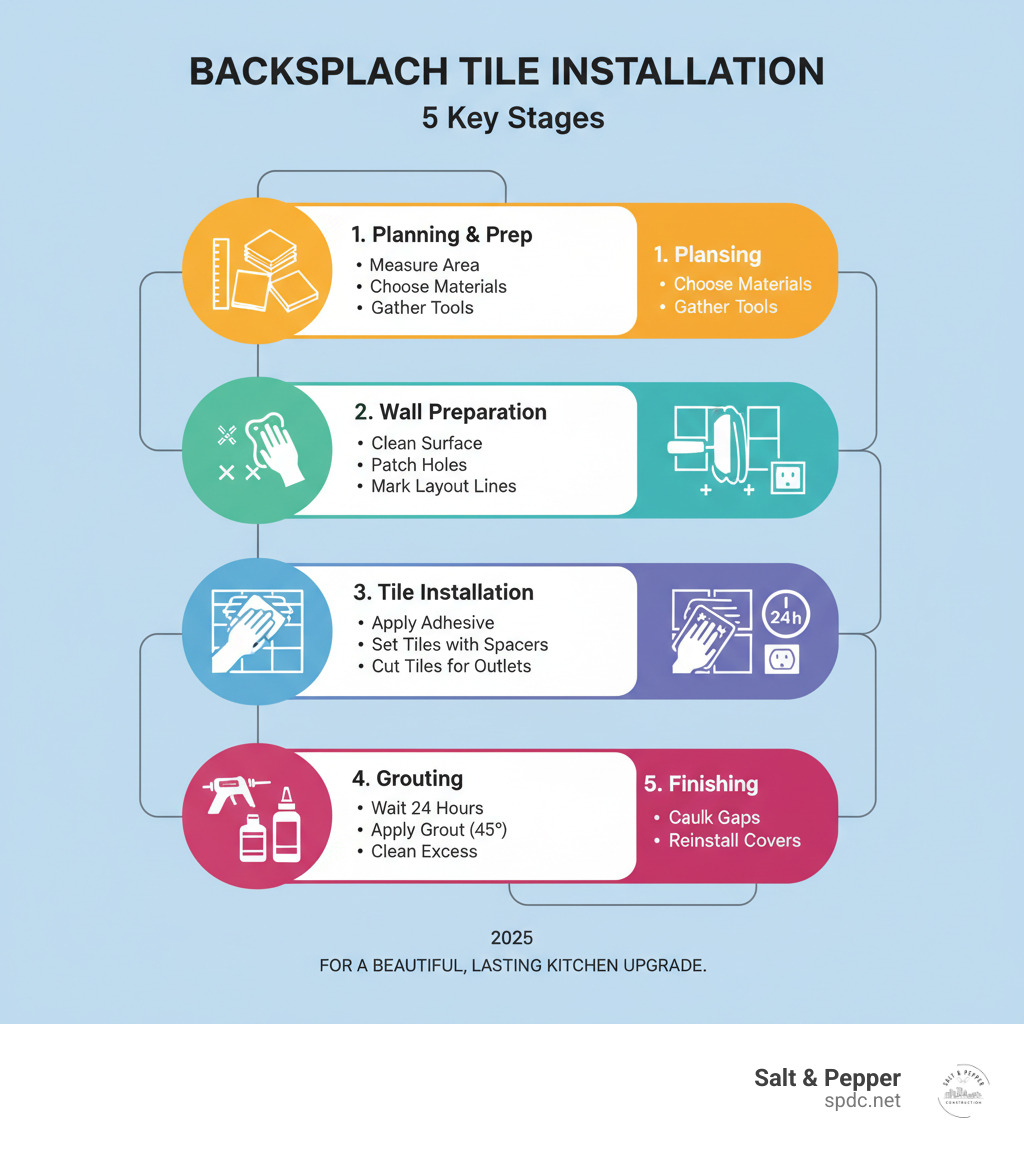
A backsplash tile installation is one of the most impactful DIY projects for your kitchen. Here’s a quick overview of the process:
- Prepare – Measure your space, choose tiles, and gather tools
- Clean & Protect – Prep the wall surface and protect countertops
- Layout – Plan your tile pattern and mark guidelines
- Install – Apply adhesive and set tiles with spacers
- Finish – Grout, seal, and caulk for a professional result
A backsplash both protects your walls from water and grease and adds visual interest, changing your kitchen’s look. Installing a backsplash yourself can save you $200 to $600 in labor costs. Most DIYers can complete the project over a weekend, and it can even increase your home’s resale value.
Whether you choose classic ceramic, sleek glass, or natural stone, the installation process follows the same fundamental steps. With proper planning, you can achieve professional-looking results.
As John Doron, owner of Salt & Pepper Construction in Tampa, I’ve seen that careful preparation is the key to a beautiful, long-lasting result in any backsplash tile installation. Let’s walk through everything you need to know to master this rewarding project.
Planning and Preparation: Your Blueprint for Success

Proper planning for your backsplash tile installation will save you headaches later. Start by measuring the width and height of each wall section to calculate the total square footage.
A pro tip: always order 10% to 15% more tile than you need. This overage covers mistakes and cuts, and ensures you have matching tiles for future repairs. Use 10% for simple patterns and 15% for intricate designs.
Before applying adhesive, do a dry layout by arranging tiles on your counter. This helps you visualize the pattern, plan cuts, and spot design issues before they become permanent.
Choosing Your Backsplash Material
Ceramic and porcelain tiles are the most popular choices, known for being affordable, durable, and easy to clean. They typically cost between $7 and $45 per square foot. Porcelain is denser and more water-resistant, making it ideal for areas near sinks.
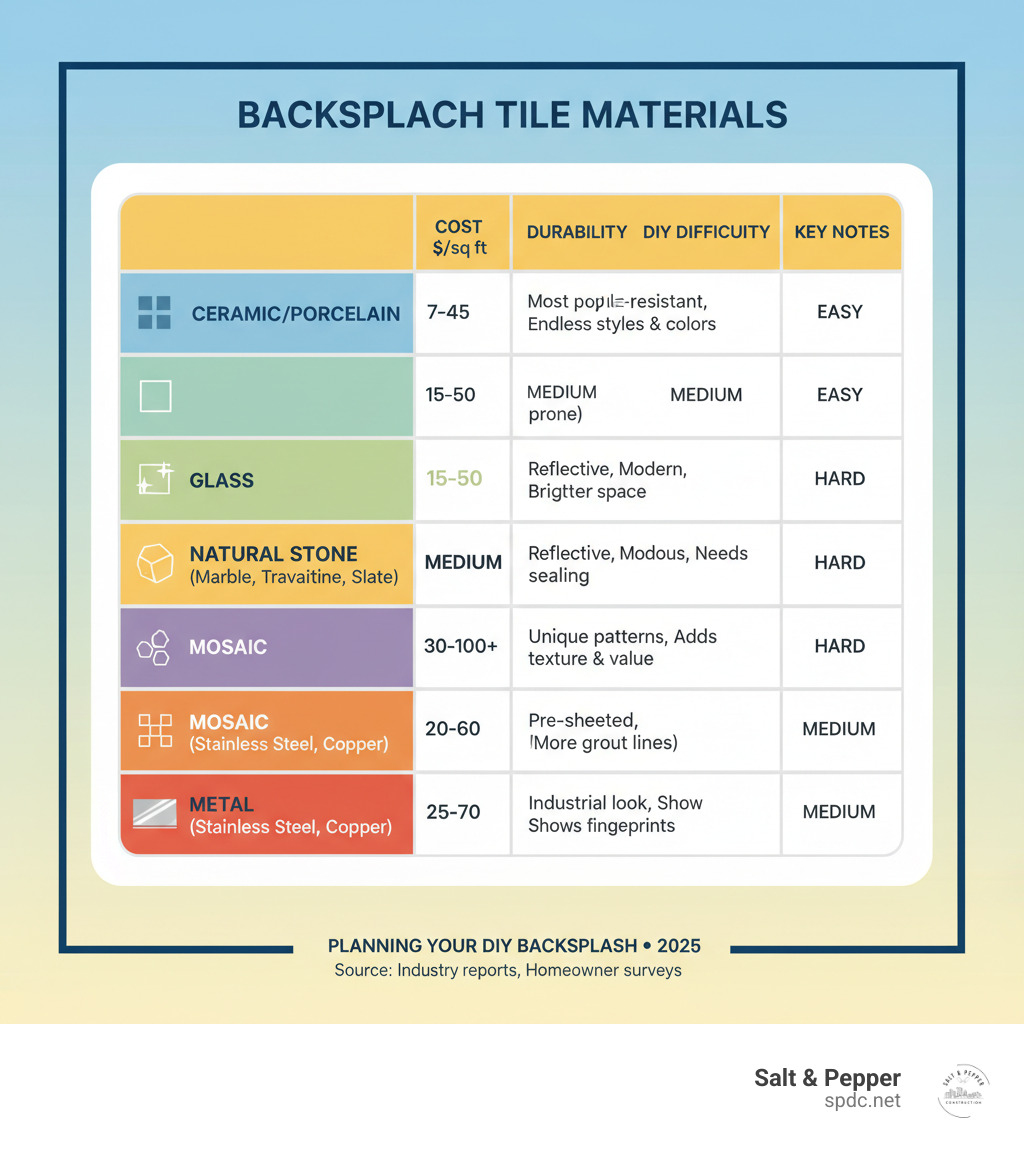
Glass tiles (up to $35/sq. ft.) add a reflective quality that can make kitchens feel larger, but they require careful cutting. Natural stone like marble or granite (up to $35/sq. ft.) offers unique patterns but is porous and needs regular sealing to prevent stains.
Mosaic sheets have tiles mounted on a mesh backing, simplifying the installation of intricate designs. For a handcrafted look, consider specialty shapes like Fireclay Pickets in Tusk Tile.
Don’t forget tile trim to finish the edges. Bullnose tiles or metal profiles like a Schluter tile edge protect edges and create a clean transition.
Essential Tools and Materials for Backsplash Tile Installation
Having the right tools is key for a successful backsplash tile installation. You’ll need:
- Measuring & Marking: Tape measure, pencil, level (a Laser Level is a great time-saver), and a utility knife.
- Cutting: A basic snap cutter for ceramic/porcelain, and a Tile wet saw for stone, glass, or complex cuts. Always wear safety glasses and gloves.
- Application: A Trowel for adhesive, a Grout Float for grout, plus buckets, Sponges, and microfiber cloths.
- Materials: Your chosen tiles, Tile Spacers, Thin-set Mortar or Tile Adhesive, grout (sanded for >1/8″ joints, unsanded for narrower), Sealer, and colour-matched caulking.
- Prep & Finishing: Drop cloths, masking tape, joint compound for repairs, and outlet box extenders.
Choosing the right trowel size is crucial for proper adhesion. The notch size determines the amount of adhesive. As a general rule:
- Small tiles/mosaics (up to 4″): 3/16″ to 1/4″ V-notch
- 4″ to 8″ tiles: 1/4″ x 1/4″ Square notch trowel
- 8″ to 16″ tiles: 1/4″ x 3/8″ square notch
- 16″+ tiles: 1/2″ x 1/2″ square notch
Always double-check your tile manufacturer’s recommendations.
Preparing the Wall and Workspace
First, clear and protect your countertops and floors with drop cloths. For safety, turn off the power to nearby outlets at the breaker and remove the covers.
The wall surface must be clean, dry, and smooth. Wash the walls with a degreaser to remove any grime. Lightly sand glossy paint to help the adhesive grip, and patch any holes or dents with joint compound, sanding smooth once dry.
For most kitchen backsplashes, you can tile directly over clean, level drywall. Unlike showers, a cement backer board isn’t usually necessary. However, applying a primer over painted or patched walls can improve adhesion. For more details, you can learn about Understanding your wall structure.
If your countertops aren’t level, you may need a ledger board—a straight 1×4 board screwed temporarily to the wall studs. This creates a perfectly level shelf to support your first row of tiles while the adhesive cures.
The Step-by-Step Backsplash Tile Installation Process
With planning complete, it’s time to set the tiles. The key to a successful backsplash tile installation is to work in small, manageable sections.
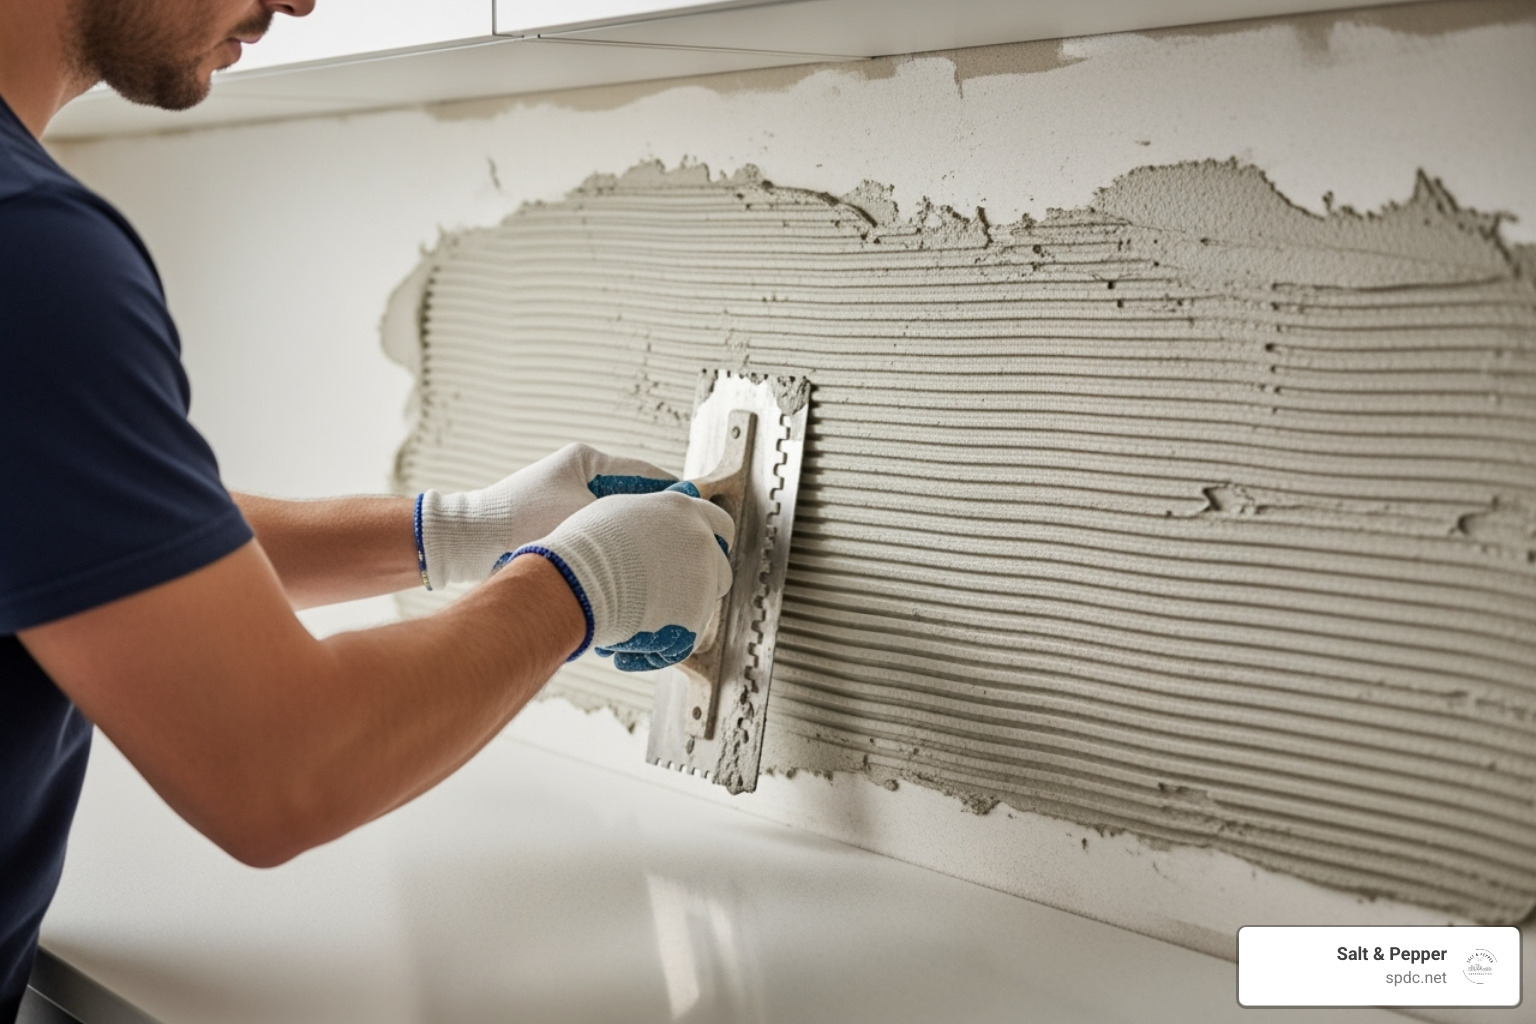
Tile adhesive starts to set in 15-20 minutes, so only spread as much as you can tile in that time. When mixing thin-set mortar, follow the package directions, including the “slaking” (resting) time, which allows polymers to activate for better adhesion. The final consistency should be like peanut butter.
In tight spaces, you can back-butter by applying mortar directly to the back of each tile instead of the wall for better control.
Planning Your Layout and First Row
First, find the center of your wall or a focal point (like behind the stove) and mark a vertical centerline with a level. This ensures your pattern looks balanced.
Next, use a Laser Level or a traditional level to draw a perfectly horizontal starting line for your first row. Your tile line must be level, even if your countertop isn’t. A crooked first row will make every subsequent row crooked.
Use Tile Spacers to leave a 1/8-inch expansion gap between the countertop and the first row of tile. This gap, which you’ll later fill with caulk, prevents cracking from expansion and contraction. It’s better to have a level tile line with a slightly varied gap at the bottom than to follow an unlevel counter.
As discussed in the planning stage, a dry layout on the counter helps you plan cuts and avoid awkward slivers of tile in visible areas. If your counter isn’t level enough to support the first row, install a temporary ledger board as a support shelf.
Applying Adhesive and Setting the Tiles
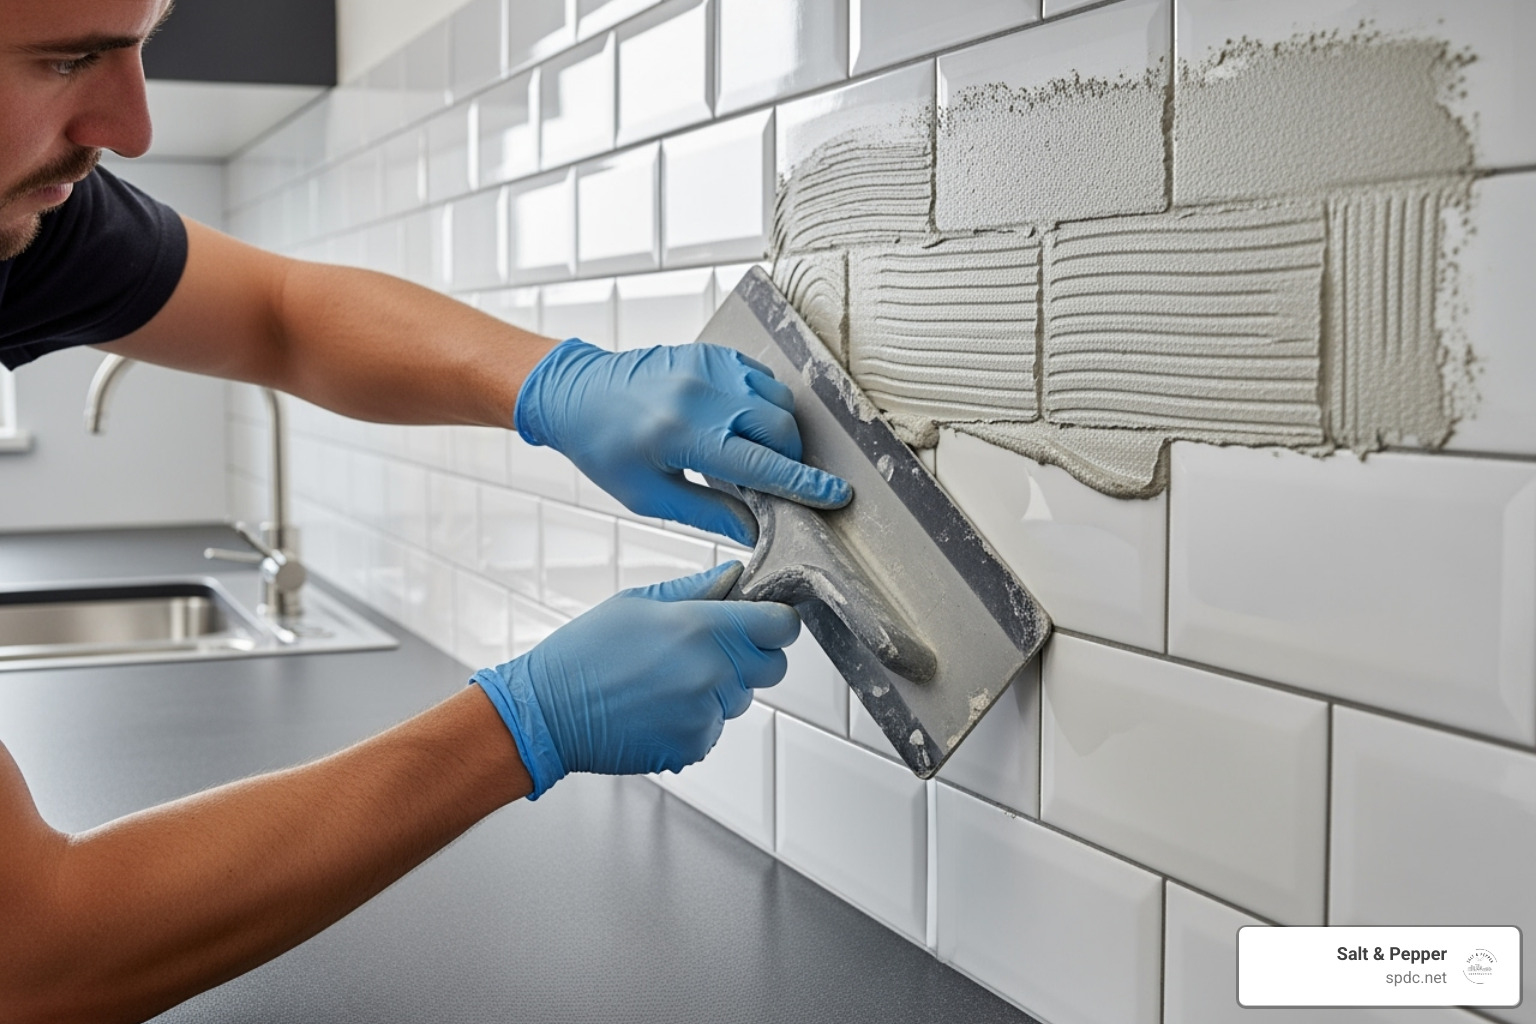
Using the flat side of your Trowel, spread a thin layer of Tile Adhesive onto a small section of the wall. Then, switch to the notched side and comb through the adhesive at a 45-degree angle to create uniform ridges.
Press your first tile into the adhesive on your level line with a slight twisting motion. This collapses the ridges and ensures good mortar coverage (aim for 80% on the back of the tile). Insert Tile Spacers between each tile to maintain consistent grout lines.
Continue setting tiles section by section, checking that they are level and flush. Immediately wipe away any mortar that squeezes into the joints with a damp sponge before it dries.
How to Cut Tile for Outlets and Edges
Cutting tile is easier than it looks. For straight cuts on ceramic or porcelain, a snap tile cutter works well. For glass, stone, or complex cuts, a Tile wet saw is the best tool (they can often be rented). Always wear safety glasses.
To cut around outlets, measure and mark the cutout on the tile. With a wet saw, you can make several parallel cuts inside the marked area and snap out the “fingers” with tile nippers. Nippers are also great for nibbling away at tile to create curved shapes.
For exposed edges, use bullnose tiles (which have a finished, rounded edge) or a metal Tile edge trim like a Schluter profile. These trims are installed along with the tile to protect the edge and provide a clean, professional finish to your backsplash tile installation.
Finishing Touches: Grouting, Sealing, and Caulking
Your tiles are set, and the adhesive is dry. Now it’s time for the finishing touches that will make your backsplash tile installation durable and beautiful.
Applying Grout for Clean, Durable Lines
Wait a full 24 hours for the mortar to cure before grouting. Rushing this step can cause tiles to shift. Once ready, mix your grout according to the directions. A pro tip: use white thin-set with light grout and dark thin-set with dark grout to prevent the adhesive color from showing through. Pre-mixed grout is also a great time-saving option.
Load your Grout Float and apply the grout at a 45-degree angle, working diagonally across the tiles. This motion forces grout deep into the joints. Press firmly to fill every gap, working in sections you can clean within 15-20 minutes.
After the grout begins to set (10-15 minutes), use a damp Sponge to gently clean the tile surfaces, again wiping diagonally. Rinse your sponge frequently in clean water. A few hours later, a light grout haze may appear; simply buff it off with a clean microfiber cloth once the surface is completely dry.
Sealing and Caulking for Long-Term Protection
Allow the grout to cure fully (typically 24-72 hours) before sealing. Once dry, apply a grout sealer using a small brush or applicator. This crucial step protects your grout from kitchen stains and moisture. If you used porous natural stone, the grout lines will still need sealing.
Next, fill the 1/8-inch expansion gaps where the tile meets the countertop, cabinets, or walls. Use a high-quality, mildew-resistant caulk—not grout—for these joints. Using a colour-matched caulking that blends with your grout will create a seamless, professional look while allowing for natural movement.
Finally, address the electrical outlets. Because the tile adds thickness to the wall, you’ll likely need outlet box extenders to bring the outlets flush with the new tile surface. Always turn off the power at the breaker before doing any electrical work. Once the extenders are in, reinstall your outlet covers and admire your finished project.
Frequently Asked Questions
Even with a detailed guide, questions often arise during a backsplash tile installation. Here are answers to some of the most common ones.
Can I install a new backsplash over existing tile?
Yes, you can often tile over an existing backsplash, which saves significant demolition time. However, this is only possible if the existing tile is flat, secure, and in good condition. Do not tile over loose, cracked, or uneven surfaces.
If you proceed, surface preparation is critical. Thoroughly clean the old tile to remove all grease and grime, then sand it with 80-grit sandpaper to scuff the glossy finish. This rough texture is essential for the new adhesive to bond properly.
Be aware that this will add thickness to your wall. You will definitely need outlet box extenders and may need a plan for finishing the thicker exposed edges, such as with quarter-round molding.
What are common mistakes to avoid in backsplash tile installation?
Avoiding these common pitfalls will help ensure a professional result:
- Improper Wall Prep: Skipping the cleaning, sanding, or patching of walls can lead to adhesion failure down the road. A clean, smooth surface is non-negotiable.
- Not Planning the Layout: Rushing in without a dry layout can result in awkward, narrow tile cuts in highly visible areas. Plan your starting point to ensure a balanced look.
- Using the Wrong Trowel: Trowel notch size dictates how much adhesive is applied. Too little creates a weak bond, while too much causes ooze-through and uneven tiles. Always follow the tile manufacturer’s recommendation.
- Letting Mortar Dry Out: Thin-set mortar “skins over” and loses its bonding ability within 15-20 minutes. Work in small, manageable sections to avoid this.
- Uneven Grout Lines: Use tile spacers consistently to achieve straight, uniform grout lines. This is a hallmark of a professional job.
- Skipping Sealer: Grout is porous and will stain easily without a sealer. Protecting your grout from kitchen spills is essential for long-term beauty.
What’s the difference between installing mosaic sheets and individual tiles?
While the basic process is similar, mosaic sheets have a few key differences. The main advantage is that the tiles are pre-arranged on a mesh backing, which speeds up the alignment of intricate patterns.
Instead of cutting tiles, you’ll often cut the mesh backing with a utility knife to fit sheets around obstacles. If an individual mosaic tile needs to be cut, a wet saw or tile nippers are still required, which can be delicate work due to the small size.
Pay close attention to spacing within the sheet. The mesh can sometimes sag or stretch, so you may need to make small adjustments to individual tiles as you press the sheet into the adhesive. Use regular tile spacers between sheets to maintain consistency.
Grouting mosaic sheets often involves narrower joints, so use unsanded grout to prevent scratching the tiles. The process can take longer due to the sheer number of joints, but the detailed result is worth the effort.
Conclusion
You did it! We’ve walked through every step of a successful backsplash tile installation together—from measuring that first wall to wiping away the final traces of grout haze. Take a moment to step back and really look at what you’ve created. That beautiful backsplash? You made that happen with your own two hands.
There’s something incredibly satisfying about changing your kitchen this way. Every time you cook dinner or clean up after breakfast, you’ll see the fruits of your labor. And beyond the visual appeal, you’ve added real, lasting value to your home. Your walls are now protected from splashes and spills, and you’ve likely increased your home’s resale value while saving hundreds of dollars in labor costs.
The skills you’ve learned here—measuring precisely, working with thin-set mortar, cutting tiles to fit perfectly around outlets—these are skills you’ll carry forward. Maybe this project will inspire you to tackle that bathroom refresh you’ve been thinking about, or perhaps you’ll help a friend with their own tiling adventure.
At Salt & Pepper Construction, we love seeing Tampa homeowners find their inner DIY expert. Whether you chose classic subway tiles, eye-catching glass mosaics, or the natural beauty of stone, your new backsplash reflects your personal style and your willingness to roll up your sleeves and get the job done right.
Of course, if this project has sparked bigger dreams for your kitchen—maybe new cabinets, upgraded countertops, or a complete layout change—we’d love to help bring those visions to life. Our team handles everything from design to the final walkthrough, so you can enjoy the results without the weekend warrior routine. Explore our kitchen remodeling services in Tampa to see how we can help you create the kitchen of your dreams.
For now, though? Enjoy your beautiful new backsplash. You’ve earned it!


